Wednesday 9 October 2013

Nero8 ျဖင့္ CD/DVD ထုတ္လုပ္နည္းလက္စြဲ(ျမန္မာလို)


အမည္ း Nero8 ျဖင့္ CD/DVD ထုတ္လုပ္နည္းလက္စြဲ
ေရးသားသူ း U Aung Lin
အမ်ိဳးအစား း pdf
အရြယ္အစား း 13 MB
Nero 8 ျဖင့္ video အေခြျပဳလုပ္ျခင္း၊ အေခြကူးျခင္း၊ Data မ်ားထည့္သြင္းျခင္း စသည့္လုပ္ေဆာင္ခ်က္မ်ားကို လုပ္ေဆာင္ေပးႏိုင္ပါတယ္။ယခုစာအုပ္တြင္ပါဝင္ေသာ သင္ခန္းစာမ်ားကို ေအာက္တြင္ေဖၚျပေပးလိုက္ပါတယ္။
  1. Nero 8 Program ထည့္သြင္းနည္း
  2. Nero 8 Program မ်ိဳးခြဲမ်ားအား ေလ့လာျခင္း
  3. Nero Manual Program အားေလ့လာျခင္း
  4. Nero BurnRight Program အားေလ့လာျခင္း
  5. Nero ControlCenter Program အားေလ့လာျခင္း
  6. Nero DiscSpeed Program အားေလ့လာအသံုးျပဳျခင္း
  7. Nero ImageDrive Program အားေလ့လာအသံုးျပဳျခင္း
  8. Nero InfoTool Program အားေလ့လာအသံုးျပဳျခင္း
  9. Nero Rescue Agent Program အားေလ့လာအသံုးျပဳျခင္း
  10. Nero BackltUp Program အားေလ့လာအသံုးျပဳျခင္း
  11. Nero Burning Rom Program ျဖင့္ Data DVD ကူးယူျခင္း
  12. Data DVD မျပည့္မခ်င္း ကူးယူျခင္း
  13. DVD Copy ကူးျခင္း
  14. DVD Video ေရြးကူးျခင္း
  15. မတူညီသည့္ DVD အေခြထဲမွ DVD Video မ်ားကို Nero Vision Program ျဖင့္ ေပါင္းစပ္ေရြးကူးျခင္း
  16. Nero Express Program ကို အသံုးျပဳၿပီး Data File မ်ားအား ကူးယူနည္း
  17. Nero Express Program ကိုအသံုးျပဳၿပီး Audio CD သီခ်င္းတစ္ေခြလံုးအား ကြန္ပ်ဴတာထဲတြင္ထည့္သြင္း သိမ္းဆည္းနည္း
  18. Audio CD အေခြထဲမွသီခ်င္းမ်ားကို WAV File အျဖစ္ေျပာင္းလဲနည္း
  19. Audio CD အေခြထဲမွသီခ်င္းမ်ားကို MP3 File အျဖစ္ေျပာင္းလဲနည္း
  20. Nero Express ျဖင့္ Mp3 CD သီခ်င္းေခြထုတ္လုပ္နည္း
  21. Nero Express ျဖင့္ Mp3 DVD သီခ်င္းေခြထုတ္လုပ္နည္း
  22. Nero Vision ျဖင့္ Video Camera မွ ဇာတ္ဝင္ခန္းမ်ားအား ရယူၿပီး VCD အေခြထုတ္လုပ္နည္း
  23. Nero Vision ျဖင့္ Video Camera မွ ဇာတ္ဝင္ခန္းမ်ားအား ရယူၿပီး DVD အေခြထုတ္လုပ္နည္း
  24. Nero Vision Program ျဖင့္ VCD 3-4 ေခြကိုစုေပါင္းၿပီး DVD Video အေခြထုတ္လုပ္နည္း
  25. Nero Recode Program ျဖင့္ DVD တစ္ေခြလံုးအား Hard Disk ထဲတြင္ ကူးယူသိမ္းဆည္းနည္း
  26. Nero Recode Program ျဖင့္ DVD တစ္ေခြလံုးအာ MP4 အျဖစ္ ခ်ံဳ႕ၿပီး Hard Disk ထဲတြင္ကူးယူသိမ္းဆည္းနည္း
  27. Nero ShowTime Player Program ျဖင့္ DVD ဇာတ္ဝင္ခန္းကိုဓါတ္ပံုရိုက္ယူျခင္း
  28. Nero PhotoSnap Program ျဖင့္ ဓါတ္ပံုမ်ားကိုအလြယ္တကူျပင္ဆင္ျခင္း
  29. Nero PhotoSnap Viewer Program ျဖင့္ အလြယ္တကူျပင္ဆင္ျခင္း
  30. Nero Wave Editor Program ျဖင့္သီခ်င္းသံမ်ားအားတည္းျဖတ္ျခင္း
  31. Nero Scratch Box ျဖင့္သီခ်င္းမ်ားအား ေပါင္းစပ္ၿပီး DJ သီခ်င္းျဖစ္ေအာင္ျပဳလုပ္ျခင္း
  32. IDE Cable မ်ားကိုအသံုးျပဳၿပီး CD/DVD Writer 3-ခုကို တပ္ဆင္ကူးယူနည္း
  33. Nero Burn ျဖင့္ CD/DVD မ်ား ကူးယူရာတြင္ႀကံဳေတြ႕ရတတ္သည့္ ျပသာနာမ်ားအားေျဖရွင္းနည္း
Nero8 ျဖင့္ CD/DVD ထုတ္လုပ္နည္းလက္စြဲ(ျမန္မာလို)
  http://www.nyinaymin.org

Windows 7 Startup ေတြကိုဘယ္လိုျမန္ေအာင္ ဖန္တီးၾကမလဲ


ဒီနည္းက ဝင္းဒိုးအတက္ Startup ကို ျမန္ေအာင္လုပ္တဲ့ နည္းေတြထဲက တခုပါပဲ..။ ဒီထဲက လုပ္နည္း အနည္းငယ္လို အရင္တုန္းက ပိုစ့္တခု တင္ေပးခဲ့ဖူးပါတယ္..။ စက္ဖြင့္ဖြင့္ခ်င္း ေဆာ့ဝဲလ္ Update ေဘာက္စ္မ်ား အတက္ရေလေအာင္၊ မပြင့္ရေလေအာင္ ဆိုတဲ့ ေခါင္းစဥ္နဲ႔ပါ..။ အဲ့ဒီပိုစ့္မွာ အခုဒီပိုစ့္ေလာက္ လုပ္နည္းေတြ မစံုခဲ့ပါဘူး..။ ဒီပိုစ့္မွာေတာ့ ေနာက္ပိုင္းမွ ထပ္သိခဲ့ရတာေလးေတြကို ေပါင္းထည့္ေပးထားလို႔ အရင္ပိုစ့္ထက္ ပိုစံုတယ္လို႔ ေျပာလို႔ရပါတယ္..။ မေန႔တေန႔က Cbox မွာေမးထားတဲ့ အစ္ကိုတစ္ေယာက္လို ကြန္ပ်ဴတာ ဖြင့္ဖြင့္ခ်င္းမွာ ေပၚလာတဲ့ ေဘာက္စ္ေတြကို ပိတ္ခ်င္တယ္ဆိုရင္ေတာ့ ဒီနည္းနဲ႔ပဲ ပိတ္တာပါ..။ 
ဒီနည္းနဲ႔ လုပ္ေပးလိုက္ရင္ ဝင္းဒိုးအတက္မွာ အရင္ကထက္ ပိုျမန္ပါလိမ့္မယ္..။ ဘာလို႔လဲဆိုေတာ့ ဝင္းဒိုးဟာ Desktop ကို ခင္းက်င္းေနတဲ့အခ်ိန္မွာ ဝင္းဒိုးထဲမွာ Install ထည့္ထားတဲ့ ေဆာ့ဝဲလ္ေတြကိုပါ လိုက္ျပီး ဆြဲထုတ္ခင္းက်င္းေနရရင္ အခ်ိန္ပိုေပးရလို႔ ပိုျပီး ၾကာပါတယ္..။ ဒီနည္းနဲ႔ Startup မွာရွိေနတဲ့ ပရိုဂရမ္ေတြကို Disable ေပးထားလိုက္ရင္ ဝင္းဒိုးအတက္ ျမန္လာပါတယ္..။ ေနာက္တခုက ဝင္းဒိုးထဲမွာ မရွိမျဖစ္လိုအပ္တဲ့ Microsoft Services တူးေတြနဲ႔ Intel Services တူးေတြကိုေတာ့ Enable (အမွန္ျခစ္ေပး) ေပးထားရပါမယ္..။ အဲ့ဒီအဓိက Tools ေတြကို Disable ေပးမိရင္ေတာ့ မိမိတို႔ရဲ႕ စက္ဟာ ေၾကာင္ေတာင္ေတာင္ ျဖစ္သြားပါလိမ့္မယ္..။ ဒါေၾကာင့္ အမွန္ျခစ္ေပးရမယ့္ ေနရာေတြနဲ႔ အမွန္ျခစ္ျဖဳတ္ရမယ့္ ေနရာေတြကို ေအာက္ကပံုေလးေတြအတိုင္း ေသခ်ာ ဂရုစိုက္ျပီး ၾကည့္ေစခ်င္ပါတယ္..။ ေသခ်ာလိုက္မွတ္ေစခ်င္ပါတယ္..။ တခုခုအမွားျဖစ္သြားတဲ့အခါ အဲ့ဒီေနရာေတြမွာပဲ ျပန္ဆန္းစစ္ၾကည့္ရင္ အေျဖမွန္ကို ျပန္ရပါလိမ့္မယ္..။ ေနာက္တခုက မိမိတို႔ကြန္ပ်ဴတာမွာ ပါတဲ့ ဦးေႏွာက္အေရအတြက္ကို တိုးျပီး အသံုးျပဳရင္လည္း စက္ကို ျမန္ေစပါတယ္..။ ဦးေႏွာက္ကို ပိုအသံုးျပဳတဲ့အတြက္ Error ေတြကိုလည္း နည္းေစပါတယ္..။ ေနာက္ျပီး ဝင္းဒိုးထဲမွာပါတဲ့ အဓိက Tools ေတြအားလံုးနီးပါးကို ဒီပိုစ့္မွာ ျပေပးထားတဲ့ နည္းနဲ႔ အလြယ္တကူ ဖြင့္ျပီး ဝင္ၾကည့္ အသံုးျပဳလို႔ ရမွာ ျဖစ္ပါတယ္..။ ဒီလုပ္နည္းေလးေတြကို လိုအပ္တဲ့ သူမ်ားနဲ႔ မသိေသးတဲ့ သူမ်ားကေတာ့ ေအာက္မွာ ပံုေလးေတြနဲ႔ ဆက္ၾကည့္ႏိုင္ပါတယ္..။ 
အရင္ဆံုး မိမိတို႔ရဲ႕ ကီးဘုတ္မွ Windows Logo + R နဲ႔ Run ေဘာက္စ္ကို ဖြင့္ျပီး msconfig လို႔ရိုက္ထည့္ျပီး OK (or) Enter ေပးလိုက္ပါ..။


အေပၚပံုေတြမွာ ျပထားတဲ့အတိုင္း Startup ကိုအရင္သြားျပီး Disable all ကိုႏွိပ္လိုက္ပါ..။ အမွန္ျခစ္ေတြ ေပ်ာက္သြားပါလိမ့္မယ္..။
 ျပီးရင္ေတာ့ ေအာက္ကပံုအတိုင္း Intel Corporation နဲ႔ Microsoft Corporation တို႔လို စာေၾကာင္းေတြနဲ႔ Bluetooth Software တို႔လို မူရင္း Driver ေတြရဲ႕ တူးေတြေနရာမွာ အမွန္ျခစ္ေလးေတြ ေရြးေပးလိုက္ပါ..။ ဘာလို႔လဲဆိုေတာ့ ဝင္းဒိုးတက္တဲ့အခ်ိန္ကစျပီး ဒီေကာင္ေလးေတြက မျဖစ္မေန အလုပ္လုပ္ရမယ့္ ေကာင္ေလးေတြမို႔လို႔ပါပဲ..။ ဒါေၾကာင့္ အမွန္ျခစ္ေရြးျပီး ေပးလိုက္ပါတယ္..။


Windows 8 အသံုးျပဳသူမ်ားအတြက္ကေတာ့ ေအာက္ကပံုေလးေတြအတိုင္း လုပ္ေပးလိုက္ပါ..။


Microsoft Corporation ဆိုရင္ေတာ့ Enable ေပးထားခဲ့ပါ..။ က်န္တဲ့ ေဆာ့ဝဲလ္ေတြဆိုရင္ေတာ့ Disable ေပးခဲ့လိုက္ပါ..။ အေပၚပံု..
ေအာက္ကပံုကေတာ့ Boot ေနရာကို ဝင္လိုက္ရင္.. စက္ဖြင့္ဖြင့္ခ်င္းမွာ Windows 7 နဲ႔ ေပၚခ်င္တယ္ ဆိုရင္ေတာ့ အျပာေရာင္နဲ႔ ျပထားတဲ့ထဲက Windows 7 စာေၾကာင္းကို တခ်က္ကလစ္ျပီး Set as default ကိုႏွိပ္ေပးလိုက္ပါ..။ W8 နဲ႔ ပါဝါအဖြင့္မွာ တက္ခ်င္တဲ့ သူမ်ားကေတာ့ Windows 8 စာေၾကာင္းကို တခ်က္ကလစ္ျပီး Set as default ကို ႏွိပ္ေပးလိုက္ပါ..။ မိမိတို႔ ေပၚေစခ်င္၊ အရင္တက္ေစခ်င္တဲ့ ဝင္းဒိုးကို ဒီေနရာမွာ ေရြးလို႔ရတယ္ဆိုတဲ့ သေဘာပါပဲ..။ အခုက်ေနာ့္စက္မွာေတာ့ W8 နဲ႔ ပါဝါအဖြင့္မွာ တက္ေအာင္ လုပ္ထားတာမို႔ Windows 8 (C: \Windows) : Current OS; Default OS လို႔ ေပၚေနတာပါ..။ W7 နဲ႔ တက္ေအာင္ လုပ္ထားရင္ေတာ့ Default OS က Windows 7 စာေၾကာင္းေနရာမွာ ေရာက္ေနပါလိမ့္မယ္..။ Timeout မွာေတာ့ ဝင္းဒိုး၂ခု ေရြးလို႔ရေအာင္ 10 seconds ေလာက္ဆိုရင္ ရပါျပီ..။ စိတ္ၾကိဳက္ျဖစ္ရင္ Apply >> OK ေပးပါ..။ ဒါေပမယ့္ မျပီးေသးပါဘူး..။ ေအာက္မွာ ဆက္ၾကည့္ပါအုန္း..။


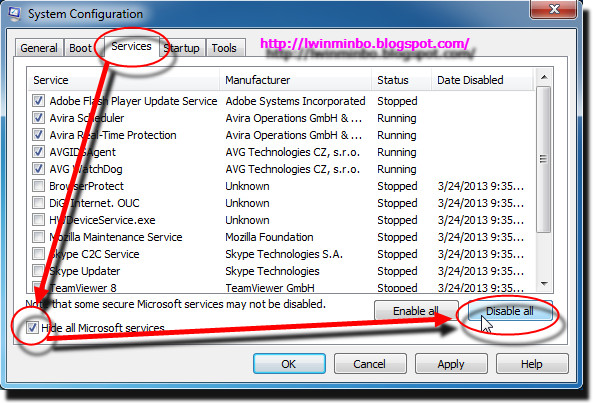
ေနာက္တဆင့္ကေတာ့ Services ေနရာကို ဝင္ျပီး ေအာက္ကပံုအတိုင္း တဆင့္ခ်င္းစီ လုပ္ေပးပါ..။ ဒီအဆင့္မွာ မွားလုပ္မိရင္ေတာ့ စက္ကို Restart ခ်ျပီးတဲ့အခါ သိရပါလိမ့္မယ္..။ အမွားလုပ္မိရင္ေတာ့ မိမိတို႔ရဲ႕စက္ဟာ ေၾကာင္ေတာင္ေတာင္ ျဖစ္သြားပါလိမ့္မယ္..။ ဒါေၾကာင့္ ပံုေလးေတြကို ေသခ်ာၾကည့္၊ စာကို ေသခ်ာဖတ္ျပီး လုပ္ေပးဖို႔ လိုပါတယ္..။ ေအာက္မွာ ဆက္ၾကည့္ပါဗ်ာ..။


Services ေနရာကို ဝင္ျပီးတဲ့အခါ အေပၚပံုမွာ ျပထားတဲ့အတိုင္း Hide all Microsoft services မွာ အမွန္ျခစ္ေလး တပ္(ထည့္)ေပးျပီး Disable all ကို ႏွိပ္လိုက္ပါ..။ ေအာက္ကပံုအတိုင္း အမွန္ျခစ္ေတြ အားလံုး ေပ်ာက္သြားပါလိမ့္မယ္..။


ျပီးရင္ေတာ့ ေအာက္ကပံုမွာ ျပထားတဲ့အတိုင္း Hide all Microsoft services မွာ အမွန္ျခစ္ျပန္ ျဖဳတ္ေပးလိုက္ပါ..။ ဒါဆိုရင္ ေအာက္ကပံုမွာ ျမင္ရတဲ့အတိုင္း Microsoft Corporation စာေၾကာင္းေတြမွာ အမွန္ျခစ္ေလးေတြ ထည့္ထားျပီးသား ျဖစ္ေနပါလိမ့္မယ္..။ ဒါဆိုရင္ ဒီအဆင့္ကို ရသြားပါျပီ..။ ေနာက္တဆင့္ကေတာ့ ေအာက္ဆံုးက ပံုေလးေတြမွာၾကည့္ေပးပါ..။


ေနာက္တဆင့္ကေတာ့ Boot တပ္ကို ျပန္ဝင္ပါမယ္..။ Set as default ကေတာ့ အေပၚမွာ ရွင္းျပေပးခဲ့ျပီးသားမို႔ ဒီအဆင့္မွာ Advanced options.. မွာ ေျပာင္းနည္းေလးကို ဆက္ၾကည့္ေပးပါ..။ 


Advanced options.. ထဲကို ေရာက္ရင္ Number of processors: မွာ အမွန္ျခစ္ေပးျပီး အေပၚပံုမွာ ျပထားတဲ့ထဲက ကြန္ပ်ဴတာ ဦးေႏွာက္အေရအတြက္ကို ပါသေလာက္ထဲက 2-3-4 ထဲက ေနာက္ဆံုး သို႔မဟုတ္ အလယ္ဂဏာန္းေလာက္ ေရြးေပးလိုက္ရင္ ရပါျပီ..။ ဦးေႏွာက္အမ်ားၾကီးေရြးယူထားရင္လည္း ဦးေႏွာက္အပူမ်ားျပီး ဦးေႏွာက္ပ်က္တတ္တယ္ဆိုတာလည္း သတိေပးခ်င္ပါေသးတယ္..။ ဒါေၾကာင့္ အလည္၊အလတ္ ေလာက္ဆိုရင္ အဆင္ေျပပါတယ္..။
ဒီပိုစ့္မွာ ျပထားတဲ့အတိုင္း စိတ္ၾကိဳက္ ေျပာင္းလဲျပီးရင္ေတာ့ Apply >> OK ေပးျပီး Restart ခ်ေပးလိုက္လို႔ ရသြားပါျပီ..။


စက္ျပန္တက္လာရင္ေတာ့ ခါတိုင္းလို ေပၚလာတတ္တဲ့ ေဘာက္စ္ေတြ မေပၚေတာ့ပဲ အရင္ကထက္ ဝင္းဒိုးအတက္ Startup မွာ ျမန္ေနတာ လက္ေတြ႕ျမင္ရပါလိမ့္မယ္..။ 
ေအာက္ကပံုေတြကေတာ့ အဲ့ဒီ Run >> msconfig မွာပဲ Tools ေနရာကေန ဝင္းဒိုးထဲက အဓိက အသံုးဝင္တဲ့ ၊ အသံုးမ်ားတဲ့ Windows Tools ေတြကို အလြယ္တကူ ဖြင့္တတ္ေအာင္၊ ဒီေနရာကေန ဝင္ျပီး ဖြင့္သံုးတတ္ေအာင္ ျပေပးထားတာပါ..။ လိုအပ္တဲ့သူမ်ားကေတာ့ ေအာက္မွာ ဆက္ၾကည့္လိုက္ပါဗ်ာ..။


အေပၚပံုနဲ႔ ေအာက္ကပံုအတိုင္း မိမိတို႔ အသံုးျပဳလိုတဲ့ တူးေလးတခုကို တခ်က္ကလစ္ျပီး Launch ကိုဆက္ႏွိပ္လိုက္ရင္ ေအာက္ဆံုးပံုအတိုင္း Windows ထဲက Tool ေလးေပၚလာပါလိမ့္မယ္..။ အျပာေရာင္နဲ႔ ျပထားတဲ့ ေနရာေတြကေတာ့ Run ေနရာမွာ အတိုေကာက္ ရိုက္ထည့္ရမယ့္ ဝင္းဒိုးတူးေတြရဲ႕ အတိုေကာက္ စာလံုးေတြပါပဲ..။ ေနာက္က .exe ဆိုတဲ့ စာသားေတြကို Run  မွာရိုက္ထည့္တဲ့အခါ .exe ထည့္ရိုက္ဖိုု႔ မလိုပါဘူး..။


အားလံုးပဲ လုပ္တတ္ကိုင္တတ္၍ အဆင္ေျပၾကပါေစဗ်ာ..။
လြင္မင္းဗုိလ္မွ

Window 8 မွ "Sorry Windows 8 isn't available for purchase in the country/region you're in" Error ေျဖရွင္းနည္း


 Amz: Window 8 Pro ကေန Window 8.1 ကုိ Upgrade လုပ္ခ်င္ရင္ Window Store ကုိ အသုံးျပဳရမယ္ေျပာပါတယ္ Window Store က  Sorry, Windows 8 isn't available for online purchase in the country/region you're in လုိ႔ ေျပာေနတယ္ Location ကုိ US လုိ႔ ျပန္ျပင္ေတာ့ လည္းမရဘူးျဖစ္ေနပါတယ္.....။

ဒီနည္းေလးနဲ႔ စမ္းၾကည့္ပါ...
 Windows 8 Upgrade Assistant  Tool ကို Run ထားရင္ အရင္ပိတ္ထယားပါ ...
 Windows 8 Upgrade Assistant  Tool  Folder မွ Upgrade Assistant. EXE ကို ရွာပါ...
ေတြ႕ရင္ EXE ေပၚမွာ Right Click ေထာက္ပါ...
Properties ကိုႏွိပ္ပါ...
Compatibility Tab မွ  "Run this program in compatibility mode for"  ကို Enable (အမွန္ျခစ္) ေပးလိုက္ပါ...
Down Arrow ေလးကိုႏွိပ္ျပီး "Windows XP (Service Pack 3)" ကို ေရြး  Apply >OK ေပးလိုက္ပါ...။
 

  Windows 8 Upgrade Assistant  Tool ကို ျပန္ Run ၾကည့္လိုက္ပါ  Sorry, Windows 8 isn't available for online purchase in the country/region you're in  ဆိုတဲ႔ Massage မရွိေတာ့ပဲ Upgrade လုပ္ႏိုင္ပါလိမ့္မယ္..။


» Method - 1

1.  First you have to configuring the Windows Store preferences in your PC. On the Start screen, tap or click Store to open the Windows Store. 2.  After Store opened, simply go to Settings. (Press Windows key + C or point your mouse to the upper-right corner of the screen, move the mouse pointer down, and then click Settings.) Windows 8 Settings3.  Now click or just tap Preferences. Your Store Preferences will open. Here you should see two options with switches.

4.  Simply just turn both of them off by moving the switches with mouse to the left side. Now close the Store app and re-open it to show effect. Now, you should have the apps which weren’t available previously. PreferencesStill If the above method doesn’t work and you still think that the apps are not appearing in Store then, you can change your PC region.

» Method - 2

Note : Before applying this please mind it that use of this method would be on your own risk. Some features of your PC might not work after changing your region

1.  First open Control Panel.
2.  In Control Panel select Clock, Language and Region (Choose Region if, you have icons view.)
3.  Now If, you have selected Clock, Language and Region  then select Region in the next page or if you have selected Region option then follow the next step.
4.  A pop-up window will be opened. If it open entitled as Region then just navigate to the Location tab.
Note : China comes first and United Stats comes second in apps availability.
5.  Only one option as Home Location will be shown in Location tab. Next select your appropriate location from the drop down menu.
6.  Now as a last step, click OK after selection for your location. Now, go to the Store and check out which apps are available in your selected region.
- See more at: http://atozhackingtricks.blogspot.com/2013/01/download-unavailable-apps-in-your.html#sthash.A9EF0hEh.dpuf

  တျခား အဆင္မေျပေသးတာရွိရင္ေတာ့ ေအာက္က နည္းေလးအတိုင္း ၾကိဳးစားၾကည့္ပါ..။
ဒီ Error ကို ကိုယ္တိုင္ မေတြ႕ၾကံဳဖူးေသးတာမို႔ မူရင္းအတိုင္းပဲ ျပန္လည္မွ်ေဝေပးလိုက္ပါတယ္... တစ္ဆင့္ခ်င္းရွင္းျပထားတာမို႔လည္း အားလံုး လုပ္တတ္ၾကမယ္လို႔ ေမွ်ာ္လင့္ပါတယ္...။
 
» Method - 1
 
1.  First you have to configuring the Windows Store preferences in your PC. On the Start screen, tap or click Store to open the Windows Store.

2.  After Store opened, simply go to Settings. (Press Windows key + C or point your mouse to the upper-right corner of the screen, move the mouse pointer down, and then click Settings.)


Windows 8 Settings3.  Now click or just tap Preferences. Your Store Preferences will open. Here you should see two options with switches.


4.  Simply just turn both of them off by moving the switches with mouse to the left side. Now close the Store app and re-open it to show effect. Now, you should have the apps which weren’t available previously. 
Preferences
Still If the above method doesn’t work and you still think that the apps are not appearing in Store then, you can change your PC region.


» Method - 2

1.  First open Control Panel.

2.  In Control Panel select Clock, Language and Region (Choose Region if, you have icons view.)

3.  Now If, you have selected Clock, Language and Region  then select Region in the next page or if you have selected Region option then follow the next step.

4.  A pop-up window will be opened. If it open entitled as Region then just navigate to the Location tab.
 
5.  Only one option as Home Location will be shown in Location tab. Next select your appropriate location from the drop down menu.
6.  Now as a last step, click OK after selection for your location. Now, go to the Store and check out which apps are available in your selected region.


အဆင္ေျပၾကပါေစ
ခင္မင္လွ်က္
ဝင္းကမာၻေက်ာ္

www.winkabarkyaw.net